IBM Verse on Premises 1.0.2 available an Passport Advantage
IBM Verse on Premises 1.0.2 is available an Passport Advantage. PartNo. CNL9UML
Whats new: https://www.ibm.com/support/knowledgecenter/SS4RQV_1.0.2/whats_new/wn_102.html
IBM Verse on Premises 1.0.2 is available an Passport Advantage. PartNo. CNL9UML
Whats new: https://www.ibm.com/support/knowledgecenter/SS4RQV_1.0.2/whats_new/wn_102.html
 To enable HTTPS on your website, you need to get a certificate from a Certificate Authority. These certificates can be rather expensive, especially if you have several domains or domains that use subject alternate names (SAN).
Let’s Encrypt is a CA that offers certificates for FREE. The only limit is that the certificates expire after 90 days. But you can renew them as often as you like.
In order to get a certificate for your website’s domain from Let’s Encrypt, you have to demonstrate control over the domain. With Let’s Encrypt, you do this using software that uses the ACME protocol, which typically runs on your web host.
Let’s Encrypt has a long list of clients that can be used for certificate creation and renewal. There are clients for Windows or Linux; none of the clients runs on both OS. You could use scripts; but you would have to install Perl, Python or other script interpreters on your Domino server, which is not always possible due to security policies.
And, there is no client for IBM Domino.
midpoints Let’s Encrypt for Domino ( midpoints LE4D ) closes this gap.
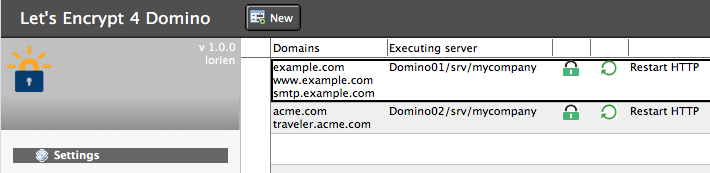
Create a new application from the template, create a configuration for your domain, install kyrtool on the server and start an agent ( the agent can later be started on a scheduled basis using a program document ).
midpoints LE4D will register a new account for your domain, creates a private user and domain key. It will then create the certificate signing request and sends it to Let’s Encrypt. Then it receives a challenge token and puts it on your server.
After Let’s Encrypt has validated the token, your certificates are being downloaded and moved to the keyring file on your server. Additionally midpoints LE4D can restart the HTTP task for you.
Interested? Then get your copy of midpoints LE4D today for FREE.
I recently was asked, if it is possible to tell the size of a container and, speaking of disk-space, what are the costs when running multiple instances of a container.
Let’s take the IBM Domino server from my previous post as an example.
You can get the SIZE of a container with the following command:
# docker ps -as -f “name=901FP9”
CONTAINER ID IMAGE COMMAND CREATED STATUS PORTS NAMES SIZE
5f37c4d6a826 eknori/domino:domino_9_0_1_FP_9 “/docker-entrypoint.s” 2 hours ago Exited (137) 6 seconds ago 901FP9 0 B (virtual 3.296 GB)
We get a SIZE of 0 B (virtual 3.296 GB) as a result. Virtual size? What is that?
Let me try and explain:
When starting a container, the image that the container is started from is mounted read-only. On top of that, a writable layer is mounted, in which any changes made to the container are written.
The read-only layers of an image can be shared between any container that is started from the same image, whereas the “writable” layer is unique per container (because: you don’t want changes made in container “a” to appear in container “b” )
Back to the docker ps -s output;
So, with a 0 B container size, it does not make any difference, if we start 1 or 100 containers.
Be aware that the size shown does not include all disk space used for a container. Things that are not included currently are;
So, let’s see what we have to add to the 0 B to get the overall size of our container.
We are using a volume “domino_data” for our Domino server . To get some information about this volume (1) type
# docker volume inspect domino_data
[
{
“Name”: “domino_data”,
“Driver”: “local”,
“Mountpoint”: “/var/lib/docker/volumes/domino_data/_data”,
“Labels”: {},
“Scope”: “local”
}
]
This gives us the physical location of that volume. Now we can get the size of the volume, summing up the size of all files in the volume.
# du -hs /var/lib/docker/volumes/domino_data/_data
1.1G /var/lib/docker/volumes/domino_data/_data
To get the size of the container configuration (2), we need to find the location for our container.
# ls /var/lib/docker/containers/
5f37c4d6a8267246bbaff668b3437f121b0fe375d8319364bf7eb10f50d72c69
Now we have the long Id for our CONTAINER ID. Next type
# du -hs 5f37c4d6a8267246bbaff668b3437f121b0fe375d8319364bf7eb10f50d72c69/
160K 5f37c4d6a8267246bbaff668b3437f121b0fe375d8319364bf7eb10f50d72c69/
Now do the math yourself. x = (0B + 1.1GB + 160kB ) * n .
I leave it up to you to find out the other sizes ( 3 – 4 ) .
Sizes may vary and will change during runtime; but I assume that you got the idea. Important to know is that all containers that are using the same image in the FROM command in a Dockerfile share this (readonly) image, so there is only one copy of it on disk.
IBM recently announced Docker support for Domino. It is supposed to come with FP10 at the end of this year.
Domino IMHO is not a microservic, but Domino on Docker has other advantages.
Think about a support person maintaining a product. All he needs to investigate a customer’s issue is the data from the customer and a Domino environment that is known to run the application stable. He can the create a new container from a Docker image, copy the files from the customer into the container, start Domino and then he can try to reproduce the issue.
You can also do this with VMs, but Docker images are more flexible. Our supporter might expect that the customer uses a specific version of Linux for the Domino server installation. But it turns out, that he uses the lastest build of the Linux OS. You would need to setup a new VM with the Linux version that is needed, install and configure Domino etc … Waste of time and resources. Using Docker, this is just one change in a Dockerfile.
I will be speaking about Docker at AdminCamp 2017 in September. I will talk about Docker in general and also about Domino on Docker. In this blogpost, I want to show, how easy it is to create a Domino image ( optional with FP), and then build and run a Docker container from the image.
I assume that you already have Docker installed on a host. I am using RHEL 7 as the host OS for Docker.
Let us start with the basic Domino 9.0.1 image. I am using the excellent start scripts for Domino by Daniel Nashed. If you run Domino on Linux and you do not already have the scripts, get and use them.
First of all, create a new directory on your host. This directory will be used to store the needed Dockerfiles. You can also download the files and use them.
All Domino installation files should be accessible from a web server. replace the YOUR_HOST placeholder with your webserver
Here is the Dockerfile for the Domino 9.0.1 basic installation.
FROM centos

ENV DOM_SCR=resources/initscripts
ENV DOM_CONF=resources/serverconfig
ENV NUI_NOTESDIR /opt/ibm/domino/

RUN yum update -y && \
    yum install -y which && \
    yum install -y wget && \
	yum install -y perl && \
    useradd -ms /bin/bash notes && \
    usermod -aG notes notes && \
    usermod -d /local/notesdata notes && \
    sed -i '$d' /etc/security/limits.conf && \
    echo 'notes soft nofile 60000' >> /etc/security/limits.conf && \
    echo 'notes hard nofile 80000' >> /etc/security/limits.conf && \
    echo '# End of file' >> /etc/security/limits.conf

COPY ${DOM_CONF}/ /tmp/sw-repo/serverconfig

RUN mkdir -p /tmp/sw-repo/ && \
    cd /tmp/sw-repo/ && \
    wget -q http://YOUR_HOST/DOMINO_9.0.1_64_BIT_LIN_XS_EN.tar && \
    tar -xf DOMINO_9.0.1_64_BIT_LIN_XS_EN.tar &&\
    cd /tmp/sw-repo/linux64/domino && \
    /bin/bash -c "./install -silent -options /tmp/sw-repo/serverconfig/domino901_response.dat" && \
    cd / && \
    rm /tmp/* -R

RUN mkdir -p /etc/sysconfig/
COPY ${DOM_SCR}/rc_domino /etc/init.d/
RUN chmod u+x /etc/init.d/rc_domino && \
    chown root.root /etc/init.d/rc_domino
COPY ${DOM_SCR}/rc_domino_script /opt/ibm/domino/
RUN chmod u+x /opt/ibm/domino/rc_domino_script && \
    chown notes.notes /opt/ibm/domino/rc_domino_script
COPY ${DOM_SCR}/rc_domino_config_notes /etc/sysconfig/
We install Domino on the latest CentOS build; if you want to use a specific CentOS build, change the first line in the Dockerfile and add the buildnumber.
You can see a lot of commands that have been combined into one RUN statement. Doing it this way, you can keep the image size a bit smaller. Each RUN command would create an extra layer and this will increase the size of your image.
So, in the first part, we update the CentOS image from the Docker repository with the latest fixes and also install additional packages that we need for the Domino installation.
Next, we copy our response.dat file and the start scripts to our image.
Now we download the Domino 9.0.1 installation package, unpack it and do a silent installation using our response.dat file for configuration.
Last part is installation of the start script files, assigning user and group and granting permissions
All temporary files are also deleted.
Now we can create an image from the Dockerfile.
docker build -t eknori/domino:9_0_1 -f Dockerfile .
This will take about 10 – 15 minutes. When the build is completed, we can list our image
# docker images
eknori/domino 9_0_1 96b6220d177c 14 hours ago 1.883 GB
Next we will use this image and install FP9. If you need some other FP, tweak the Dockerfile to your own needs. Once you get familiar to Docker, this is easy.
FROM eknori/domino:9_0_1

ENV DOM_CONF=resources/serverconfig
ENV NUI_NOTESDIR /opt/ibm/domino/

COPY ${DOM_CONF}/ /tmp/sw-repo/serverconfig

RUN mkdir -p /tmp/sw-repo/ && \
cd /tmp/sw-repo/ && \
wget -q http://YOUR_HOST/domino901FP9_linux64_x86.tar && \
tar -xf domino901FP9_linux64_x86.tar &&\
cd /tmp/sw-repo/linux64/domino && \
/bin/bash -c "./install -script /tmp/sw-repo/serverconfig/domino901_fp9_response.dat" && \
cd / && \
rm /tmp/* -R && \
rm /opt/ibm/domino/notes/90010/linux/90010/* -R
A much shorter Dockerfile, as we already have installed Domino and now can reuse the 9_0_1 image as the base image for our 9_0_1_FP_9 image.
The last line in the RUN command removes the uninstall information. Maybe this can be done in the response.dat file also, but you should do this anyway, as we do not need the backup files.
Again, build the new image.
docker build -t eknori/domino:9_0_1_FP_9 -f Dockerfile .
# docker images
eknori/domino 9_0_1_FP_9 ed0276f21d73 14 hours ago 3.296 GB
Now we can build or final Domino 9.0.1FP9 from the 9_0_1_FP_9.
Our Dockerfile looks like this
FROM eknori/domino:9_0_1_FP_9

EXPOSE 25 80 443 1352

COPY resources/docker-entrypoint.sh /
RUN chmod 775 /docker-entrypoint.sh

USER notes
WORKDIR /local/notesdata
ENV LOGNAME=notes
ENV PATH=$PATH:/opt/ibm/domino/

ENTRYPOINT ["/docker-entrypoint.sh"]
and the file used in the ENTRYPOINT command contains the following
#!/bin/bash

serverID=/local/notesdata/server.id

if [ ! -f "$serverID" ]; then
/opt/ibm/domino/bin/server -listen 1352
else
/opt/ibm/domino/rc_domino_script start
/bin/bash
fi
The ENTRYPOINT is executed when the container starts. The script just checks, if the server is already configured. If not, it starts the server in LISTEN mode. If it finds a server.id, it starts the server.
Let us build or final image.
docker build -t eknori/domino:domino_9_0_1_FP_9 -f Dockerfile .
# docker images
eknori/domino domino_9_0_1_FP_9 1fae2fe73df4 2 hours ago 3.296 GB
Now we are ready to create a container from the image. But we need one additional step. All changes that we make in a container will be lost, once the container is stopped. So we need to create a persitent data store and attach it to the container.
To create a persitent volume, type
docker volume create –name=domino_data
And then type
docker run -it -p 1352:1352 -p 8888:80 -p 8443:443 –name 901FP7 -v domino_data:/local/notesdata eknori/domino:domino_9_0_1_FP_9
to build and run the container. I have used port 1352 instead of 8585 to avoid to open another port on the host system.
After the build, the ENTRYPOINT will start the Domino server in LISTEN mode. You can now setup your server using the remote setup tool.
After you have setup your server, close the remote setup and stop Domino. This will also stop your container.
You can start and get access to the container with
docker start 901FP9
docker attach 901FP9
This gives you great flexibility. Once FP10 is in the wild, create a new image from the 9_0_1 image and install FP10. Then create a new image for your final Domino installation. Run this image and attach the persitent volume.