Happy New Year 2019

Fixing memory leaks may not be not the shiniest skill on a CV, but when things go wrong on production, it’s better to be prepared!
After reading this article, you’ll be able to monitor, understand, and debug the memory consumption of a Node.js application.
Kévin Maschtaler
https://marmelab.com/blog/2018/04/03/how-to-track-and-fix-memory-leak-with-nodejs.html
In addition to this very good article , here are a couple of tipps how to enable remote debugging.
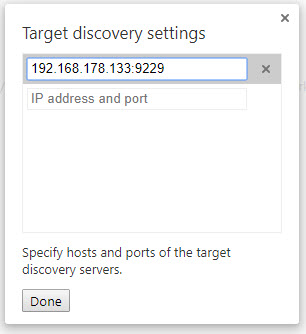
node –inspect=192.168.178.133:9229 yourapp.js
This will bind the debugger to a different IP address:port. Otherwise only LOCALHOST will be available
If you are using PM2
pm2 start –node-args=”–inspect=192.168.178.133:9229″ yourapp.js
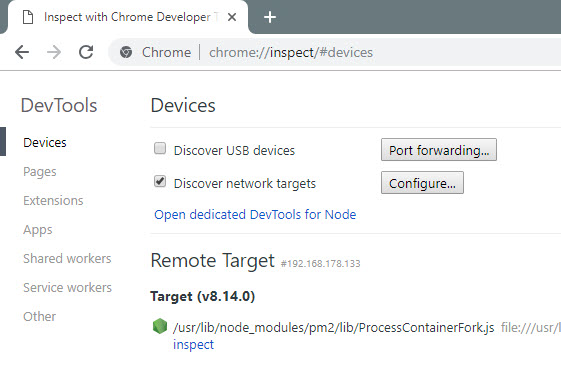
Then open Chrome browser and navigate to chrome://inspect
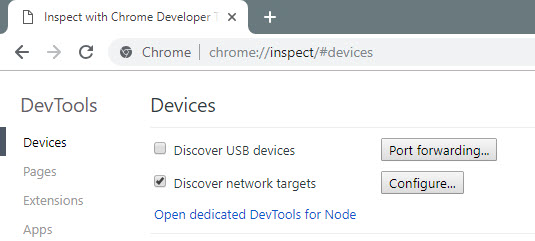
Check “Discover network targets” and click “Configure”
Your application is ready for inspect
I have put together a small sample to demonstrate how to use NotesDominoQuery from LotusScript.
I created a new Class DQLWrapper. A little bit over the top, I know.
%REM
	Library 10010.dql
	Created Dec 30, 2018 by Ulrich Krause/singultus
%END REM
Option Declare

%REM
	Class DqlWrapper
%END REM
Public Class DqlWrapper

	m_query As String
	m_session As NotesSession
	m_db As NotesDatabase
	m_ndq As NotesDominoQuery

	%REM
		Sub New
	%END REM
	Public Sub New(strDbFilePath As String)
		Set me.m_session = New NotesSession
		Set me.m_db = me.m_session.Getdatabase("",strDbFilePath, False)
		If ( me.m_db.Isopen ) then
			Set me.m_ndq = me.m_db.Createdominoquery()
		Else
			' // do some error handling
		End if
	End Sub

	%REM
		Public function executeQuery()
	%END REM
	Public function executeQuery() As NotesDocumentCollection
		If ( me.m_query <> "" ) then
			Set executeQuery = me.m_ndq.Execute(me.m_query)
		Else
			Set executeQuery = nothing
		End If
	End Function

	%REM
		Public Function explainQuery()
	%END REM
	Public Function explainQuery() As String
		If ( me.m_query <> "" ) Then
			explainQuery = me.m_ndq.Explain(me.m_query)
		Else
			explainQuery = ""
		End If

	End Function

	%REM
		Public Function explainQuery()
	%END REM
	Public Function parseQuery() As String
		If ( me.m_query <> "" ) Then
			parseQuery = me.m_ndq.parse(me.m_query)
		Else
			parseQuery = ""
		End If

	End Function

	%REM
		Property query
	%END REM
	Public Property Set query As String
		me.m_query = query
	End property

End Class
The query itself is executed from an agent that runs on the server. At the moment it is not possible to run a query client/ server.
Here is the code for the agent
%REM
	Agent dql.execute
	Created Dec 30, 2018 by Ulrich Krause/singultus
%END REM
Option Public
Option Declare
Use "10010.dql"

Sub Initialize
	Dim query As String
	Dim col As  NotesDocumentCollection
	query = "firstname = 'Ulrich' And lastname = 'Krause'"

	Dim dql As New DQlWrapper("names.nsf")
	dql.query = query

	If (  LCase(dql.parseQuery()) ="success" ) Then

		Set col = dql.executeQuery()
		MsgBox "QRY returns # docs: " + CStr(col.count)

		If ( col.count > 0 ) then
			Dim doc As NotesDocument
			Set doc = col.Getfirstdocument()
			MsgBox "UNID of first doc: " + doc.Universalid
		End if
	Else

		MsgBox dql.explainQuery()
	End If

End Sub
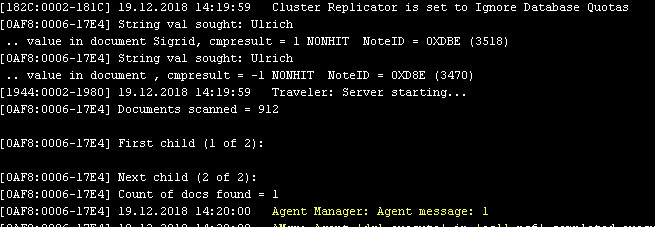
You can now start the agent from the server console. You will get the number of documents for this query and the UNID of the first document found.
te amgr run "ec11.nsf" 'dql.execute'
 [0DFC:001F-0FFC] 30.12.2018 13:49:10   AMgr: Start executing agent 'dql.execute' in 'ec11.nsf'
 [0DFC:001F-0FFC] 30.12.2018 13:49:10   Agent Manager: Agent message: QRY returns # docs: 1
 [0DFC:001F-0FFC] 30.12.2018 13:49:10   Agent Manager: Agent message: UNID of first doc: D8436D0F4E546BA3C12573FE0070AE88
 [0DFC:001F-0FFC] 30.12.2018 13:49:10   AMgr: Agent 'dql.execute' in 'ec11.nsf' completed execution
If your query contains errors / is not understandable, you will see an output similar like this on your console
[0DFC:0020-11D0] 30.12.2018 13:59:45   Agent Manager: Agent 'dql.execute' error: Domino Query execution error:   Query is not understandable -  syntax error     - processing or expecting operator (=, <, <= …) token syntax    (Call hint: OSCalls::OSLocalAllc, Core call
 0)  firstname = 'Ulrich' And lastname IS 'Krause' …………………………….^………..  ****
 [0DFC:0020-11D0] 30.12.2018 13:59:45   AMgr: Agent 'dql.execute' in 'ec11.nsf' completed execution
In a test or development environment we can start a node.js application with npm start . But this is not, what we want to do in production.
We need to start the application as soon as the server is up and running.
Here is a quick and easy way to achieve this goal.
Create a new file in /etc/systemd/system ( domino-db.service for example )
[Unit]
Description=domino-node-list sample

[Service]
ExecStart=/git/domino-node-list/app.js
Restart=always
User=root
Group=root
Environment=PATH=/usr/bin:/usr/local/bin
Environment=NODE_ENV=production
WorkingDirectory=/git/domino-node-list/

[Install]
WantedBy=multi-user.target
Modify ExecStart and WorkingDirectory to point to the correct path in your installation.
Save domino-db.service and set execution rights to 744.
Check app.js for proper execution right (744).
Edit app.js and add
#!/usr/bin/env node
as the first line in the code.
Enable the service
systemctl enable domino-db

Created symlink from /etc/systemd/system/multi-user.target.wants/domino-db.service to /etc/systemd/system/domino-db.service.
Check with
systemctl status domino-db

● domino-db.service - domino-node-list sample
   Loaded: loaded (/etc/systemd/system/domino-db.service; enabled; vendor preset: disabled)
   Active: active (running) since Sun 2018-12-30 10:24:04 CET; 4min 15s ago
 Main PID: 7163 (node)
    Tasks: 7
   CGroup: /system.slice/domino-db.service
           └─7163 node /git/domino-node-list/app.js

Dec 30 10:24:04 serv02.fritz.box systemd[1]: Started domino-node-list sample.
Dec 30 10:24:04 serv02.fritz.box systemd[1]: Starting domino-node-list sample...
Dec 30 10:24:05 serv02.fritz.box app.js[7163]: Example app listening at http://:::3000
You can now start and stop the service at any time using
systemctl start domino-db
systemctl stop domino-db
This is a follow up to my recent post https://www.eknori.de/2018-12-28/problem-using-proton-with-proton_ssl1-enabled/
Due to my misunderstanding and also a lack in documentation, I was not able to get PROTON with PROTON_SSL=1 and PROTON_AUTHENTICATION=client_certs running.
But thanks to our great community and a little help from Jan Krejcárek (SUTOL), I was finally able to solve the puzzle.
I must admit that I am not an expert in this field. So please bare with me if things are obvious for you. They are (not yet) for me.
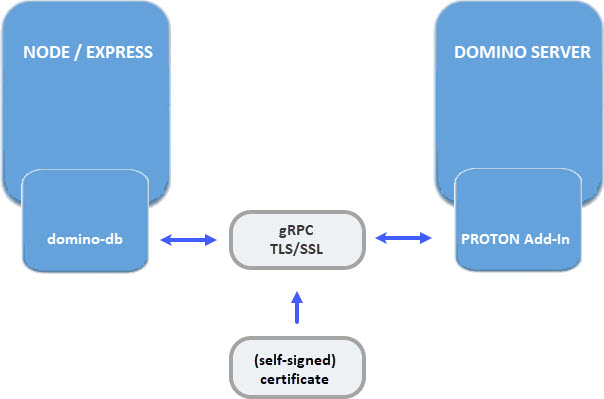
My understanding of using TLS/SSL with PROTON was that I could use my existing Let’s Encrypt certificate to communicate via HTTPS instead of HTTP with my server URL.
But this is not the case. TLS/SSL encryption only enables a secured communication between the domino.db module and the PROTON addin sitting on the Domino server.
Here is an image.
The second thing that I got wrong was the fact that the existing certificate and it’s CA would be enough to enable the secured communication. In my first test, I had set PROTON_AUTHENTICATION=anonymous.
So why bother with client certificates if they are not needed at this point?
I followed Jan’s advice to try with a new generated self-signed certificate. The AppDevPack contains shell scripts to create some sample certs and also lets you create a keyring file that can be used with PROTON.
I have modified the make_keyring.sh file a bit because it complained about missing environment variables.
# added UKR, 12/2018
export NOTESDATA=/local/notesdata
export NOTESBIN=/opt/ibm/domino/notes/10000000/linux
I then created the certs and keyring and copied them to the proper location.
The original source code has used
// proton config
const serverConfig = {
    "hostName": "serv02.fritz.box",
    "connection": {
        "port": 3002
    }
}
to define the serverConfig. This must be enhanced, if you are going the secure way.
I created a new module using Jan’s code
const fs = require('fs');
const path = require('path');

/**
 * Internal functions that reads a content of a file to a buffer.
 * @param {string} fileName
 */
const readFile = fileName => {
        return fs.readFileSync(path.resolve(fileName));
}

/**
 * (c) Jan Krejcárek
 * Creates an object in a structure required for the DominoDB module
 * to initialize o connection to the Domino server.
 * @param {string} serverHostName Host name of the Domino server
 * @param {string} port TCP port number where a Proton task listens for connection requests
 * @param {string} rootCertificatePath Path to the certificate used to establish a TLS connection
 * @param {string} clientCertificatePath Path to the application certificate used to authenticate the application
 * @param {string} clienKeyPath Path to the private key of the application
 */
const config = (serverHostName, port, rootCertificatePath, clientCertificatePath, clienKeyPath) => {
    const rootCertificate = readFile(rootCertificatePath);
    const clientCertificate = readFile(clientCertificatePath);
    const clientKey = readFile(clienKeyPath);

    const serverConfig = {
            hostName: serverHostName,
            connection: {
                    port: port,
                    secure: true
            },
            credentials: {
                    rootCertificate,
                    clientCertificate,
                    clientKey
            }
    };

    return serverConfig;
};

module.exports = config;
All parts in the credentials section are mandatory. Even if you use PROTON_AUTHENTICATION=anonymous with PROTON_SSL=1, you must have certificates and keys for the client as well.
And we can now use this module in app.js
const protonConfig = require('./protonConfigSSL.js');
const serverConfig = protonConfig("serv02.fritz.box", "3002", "./certs/proton-self/ca.crt", "./certs/proton-self/app1.crt", "./certs/proton-self/app1.key");
My PROTON configuration is
[029971:000009-00007F78D8293700] PROTON_AUTHENTICATION=client_cert
[029971:000009-00007F78D8293700] PROTON_KEYFILE=proton-self.kyr
[029971:000009-00007F78D8293700] PROTON_LISTEN_ADDRESS=serv02.fritz.box
[029971:000009-00007F78D8293700] PROTON_LISTEN_PORT=3002
[029971:000009-00007F78D8293700] PROTON_SSL=1
[029971:000009-00007F78D8293700] PROTON_TRACE_REQUEST=0
[029971:000009-00007F78D8293700] PROTON_TRACE_SESSION=0
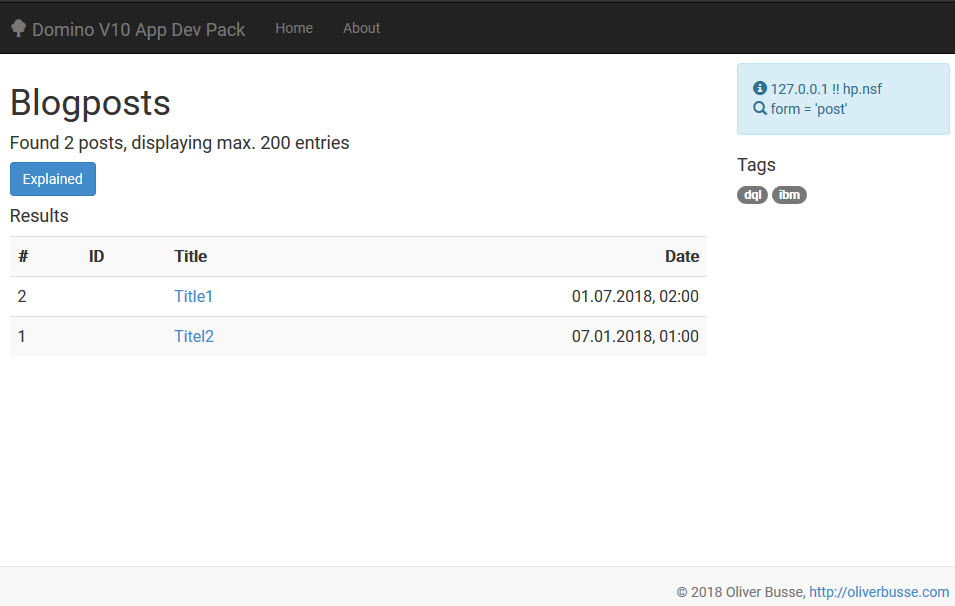
And after restarting PROTON ( restart task proton ) and starting my application ( npm start ), I was able to open hp.nsf in the browser.
I also found an interesting article by Sven Hasselbach about how to protect PROTON keys.
I hope that this will help others starting with this stuff to save some time.
Heiko Voigt: DominoDB and a big NO-NO !
Sven Hasselbach ( response to Heiko’s post ): DominoDB and a big NO-NO?
By default, PROTON supports anonymous access and an insecure connection. This is a good starting point, but if you want to do something more productive, you should at least have PROTON_SSL set to 1 and a valid certificate at hand.
You can also use a self signed certificate, but most, if not all browsers will reject it. I am using a certificate issued by Lets Encrypt. This is the same certificate that I am using on my Domino server to secure HTTPS connections.
My sample node application uses the excellent sample written by Oliver Busse from https://gitlab.com/obusse/domino-node-list
I have changed package.json to use the latest domino-db module
{
"name": "domino-node-list",
"version": "1.0.0",
"description": "",
"main": "app.js",
"scripts": {
"start": "node app.js",
"test": "echo \"Error: no test specified\" && exit 1"
},
"author": "",
"license": "ISC",
"dependencies": {
"@domino/domino-db": "file:vendor/domino-domino-db-1.1.0.tgz",
"ejs": "^2.6.1",
"express": "^4.16.3"
}
}
I also left app.js unchanged
// domino-db
const {
useServer
} = require('@domino/domino-db');

// proton config
const serverConfig = {
"hostName": "127.0.0.1",
"connection": {
"port": 3002
}
}

// domino nsf
const databaseConfig = {
"filePath": "hp.nsf"
};
I created hp.nsf according to the NSF source description in the reporitory.
Needed ports on the host are open
[root@serv02 domino-node-list]# firewall-cmd --list-ports
22/tcp 8585/tcp 1352/tcp 3001/tcp 3002/tcp 3000/tcp 10000/tcp 21/tcp 8443/tcp 443/tcp 80/tcp
First test with
PROTON_AUTHENTICATION=anonymous
PROTON_LISTEN_ADDRESS=0.0.0.0
PROTON_LISTEN_PORT=3002

12/28/2018 04:36:56.50 AM PROTON> Listening on 0.0.0.0:3002, INSECURE
12/28/2018 04:36:56.50 AM PROTON> Server initialized
12/28/2018 04:36:56.50 AM PROTON> Server allows Anonymous access only.
node app has been started
> domino-node-list@1.0.0 start /git/domino-node-list
> node app.js
 Example app listening at http://:::3000
In the browser, I typed http://eknori.blogsite.org:3000/
On the server console, I got:
[013713:000006-00007FCB3C40C700] 12/28/2018 04:39:42.88 AM PROTON> Session::init()
[013713:000006-00007FCB3C40C700] Tokens parsed
 …
[013713:000006-00007FCB3C40C700] order = 1, level = 0, token = {form}, delim { } type = IDENTIFIER, opertype = NOT AN OPERATION, booltype = NONE
[013713:000006-00007FCB3C40C700] order = 2, level = 0, token = {=}, delim { } type = OPERATOR, opertype = EQUALITY, booltype = NONE
[013713:000006-00007FCB3C40C700] order = 3, level = 0, token = {'post'}, delim {'} type = QUOTED STRING, opertype = NOT AN OPERATION, booltype = NONE
 …
[013887:000009-00007F93BA436700] Documents scanned = 4
[013887:000009-00007F93BA436700] Count of docs found = 2
Next, I tried with PROTON_SSL=1 ( eknori.kyr uses a valid Lets Encrypt certificate, no client certificates created and configured at this time )
sh con proton*
PROTON_AUTHENTICATION=anonymous
PROTON_KEYFILE=eknori.kyr
PROTON_LISTEN_ADDRESS=0.0.0.0
PROTON_LISTEN_PORT=3002
PROTON_SSL=1
PROTON_TRACE_REQUEST=1
PROTON_TRACE_SESSION=1

lo proton
12/28/2018 04:10:14.55 AM PROTON> Build 0.2.2
12/28/2018 04:10:15.69 AM PROTON> Listening on 0.0.0.0:3002, SSL-ENABLED
12/28/2018 04:10:15.69 AM PROTON> Server initialized
12/28/2018 04:10:15.69 AM PROTON> Server allows Anonymous access only.

sh ta o
PROTON               Listening on 0.0.0.0:3002, SSL-ENABLED
HTTP Server          Listen for connect requests on TCP Port:80, 443
When I know try to open https://eknori.blogsite.org:3000, I get
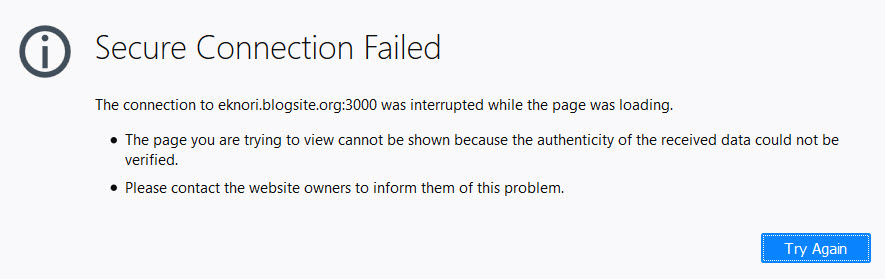
Secure Connection Failed
The connection to eknori.blogsite.org:3000 was interrupted while the page was loading.The page you are trying to view cannot be shown because the authenticity of the received data could not be verified. Please contact the website owners to inform them of this problem.
Request headers (355 B)
Accept text/html,application/xhtml+xm…plication/xml;q=0.9,/;q=0.8
Accept-Encoding gzip, deflate, br
Accept-Language en-US,de;q=0.7,en;q=0.3
Connection keep-alive
DNT 1
Host eknori.blogsite.org:3000
Upgrade-Insecure-Requests 1
User-Agent Mozilla/5.0 (Windows NT 10.0; …) Gecko/20100101 Firefox/64.0
I have verified that I can connect to PROTON
[root@serv02 domino-node-list]# openssl s_client -connect eknori.blogsite.org:3002
 CONNECTED(00000003)
 depth=2 O = Digital Signature Trust Co., CN = DST Root CA X3
 verify return:1
 depth=1 C = US, O = Let's Encrypt, CN = Let's Encrypt Authority X3
 verify return:1
 depth=0 CN = eknori.blogsite.org
 verify return:1
 Certificate chain
  0 s:/CN=eknori.blogsite.org
    i:/C=US/O=Let's Encrypt/CN=Let's Encrypt Authority X3
  1 s:/C=US/O=Let's Encrypt/CN=Let's Encrypt Authority X3
    i:/O=Digital Signature Trust Co./CN=DST Root CA X3
 Server certificate
 -----BEGIN CERTIFICATE-----
 MIIFkzCCBHugAwIBAgISA02ojw4Nx7YNceZNEQjzQ6HRMA0GCSqGSIb3DQEBCwUA
 MEoxCzAJBgNVBAYTAlVTMRYwFAYDVQQKEw1MZXQncyBFbmNyeXB0MSMwIQYDVQQD
 ExpMZXQncyBFbmNyeXB0IEF1dGhvcml0eSBYMzAeFw0xODExMjQwOTI5NDdaFw0x
 OTAyMjIwOTI5NDdaMB4xHDAaBgNVBAMTE2Vrbm9yaS5ibG9nc2l0ZS5vcmcwggEi
 MA0GCSqGSIb3DQEBAQUAA4IBDwAwggEKAoIBAQCF64IGqJ1K6AB4Is7KasQEdaiv
 gN5Fh1VUulz8xY/hCshgyIP46weexrU6jpmUE/DUQSuC/YfzpF7wohZrtd+4AHwd
 Hu+ICmGh8tGa1KRv2j/Gpu2Cj1h1uXms+qdMBX/fQzQ9pM/8o4PS1NvUkt58dpL0
 1zpbyr9ibbfGV1VPE68zCDWYT+S1VhC/sXt09B32zsd+LC5bJgtqbYUa5dghbDnY
 G7qLI3ahy/atRMD4+Qdyk4yJqqQO58LMKO/+h9er8JNxMXoDDaT54Sq7owRHm3Vn
 EkomPPriIXEizqXd1GwpAYc/uiaOYUorUFnoA40u8Gi2RlTHh2ze6rLzplrnAgMB
 AAGjggKdMIICmTAOBgNVHQ8BAf8EBAMCBaAwHQYDVR0lBBYwFAYIKwYBBQUHAwEG
 CCsGAQUFBwMCMAwGA1UdEwEB/wQCMAAwHQYDVR0OBBYEFGUvZj1OYKlDBGAiMref
 eMYoSN0dMB8GA1UdIwQYMBaAFKhKamMEfd265tE5t6ZFZe/zqOyhMG8GCCsGAQUF
 BwEBBGMwYTAuBggrBgEFBQcwAYYiaHR0cDovL29jc3AuaW50LXgzLmxldHNlbmNy
 eXB0Lm9yZzAvBggrBgEFBQcwAoYjaHR0cDovL2NlcnQuaW50LXgzLmxldHNlbmNy
 eXB0Lm9yZy8wUgYDVR0RBEswSYITZWtub3JpLmJsb2dzaXRlLm9yZ4IPZWtub3Jp
 LnNwZG5zLmRlgg9la25vcmkuc3BkbnMuZXWCEGVrbm9yaS5zcGRucy5vcmcwTAYD
 VR0gBEUwQzAIBgZngQwBAgEwNwYLKwYBBAGC3xMBAQEwKDAmBggrBgEFBQcCARYa
 aHR0cDovL2Nwcy5sZXRzZW5jcnlwdC5vcmcwggEFBgorBgEEAdZ5AgQCBIH2BIHz
 APEAdwB0ftqDMa0zEJEhnM4lT0Jwwr/9XkIgCMY3NXnmEHvMVgAAAWdFRKvdAAAE
 AwBIMEYCIQCbF0dO0sH/+n0JgzUdKrNQdSXi0icdC/tcgoZJMWbBsQIhALrmWoIq
 aOAryVyB5BdiIaCJ4gkQpltzZlMXsf2a8S6EAHYAY/Lbzeg7zCzPC3KEJ1drM6SN
 YXePvXWmOLHHaFRL2I0AAAFnRUSr+gAABAMARzBFAiARZMQ/xNmVsD1AtFKhsjP/
 JT7Ly1w/4t1lpCc9llWC6gIhAL9AvzdQfP3JSezUftlhbQwUq8pl87yilvM7tF/6
 fJm9MA0GCSqGSIb3DQEBCwUAA4IBAQBWBIEnaXToqKlLepvxllJzJRaG4IdtDpHC
 BN+bSsf5pCR9a1IOiJURdneLUF2RFYEtK8YOsWhEgpFodC/lEGC7P9AlPwK24/vO
 Wyd2jPbCgpyzmp+8Hc6QLhttxz+Pd+MrjKFuYhpFkGqigAZGywiz12wPjhNOwhkI
 iLpGENPnfJA/DPD01Zk0/4+toAhayuKqzVVB47W2O88dHB5TpsknGwVAWBAouTpm
 hy8mHuVNk0+fwXGn739kLgZlsv95NWLCLIo5InJ5eHSQKgAU9uzRo5fzFXdRgxHk
 w+4uKbruLxzi2IXUA214xEycylq49/jXePphfAsPXDvMYtmQRLcx
 -----END CERTIFICATE-----
 subject=/CN=eknori.blogsite.org
 issuer=/C=US/O=Let's Encrypt/CN=Let's Encrypt Authority X3
 No client certificate CA names sent
 Peer signing digest: SHA256
 Server Temp Key: ECDH, P-256, 256 bits
 SSL handshake has read 3260 bytes and written 415 bytes
 New, TLSv1/SSLv3, Cipher is ECDHE-RSA-AES256-GCM-SHA384
 Server public key is 2048 bit
 Secure Renegotiation IS supported
 Compression: NONE
 Expansion: NONE
 No ALPN negotiated
 SSL-Session:
     Protocol  : TLSv1.2
     Cipher    : ECDHE-RSA-AES256-GCM-SHA384
     Session-ID: 49DA29C84DEFE38DAE3B7458F1E59859145DC5C27A27B248E1AC1958175F3BCC
     Session-ID-ctx:
     Master-Key: EC83FBCB155BEF83E9450C73D6A56A487DE933FC2D1405F3D95E725D9698962378BC65CA8D683F985415DF02D39A266F
     Key-Arg   : None
     Krb5 Principal: None
     PSK identity: None
     PSK identity hint: None
     TLS session ticket lifetime hint: 7200 (seconds)
     TLS session ticket:
     0000 - b8 b4 e4 5d 80 ec 53 c5-a5 06 8c 23 19 82 2e f2   …]..S….#….
     0010 - 4e 66 a9 3a 5c d6 d6 09-b1 cb 69 b2 2e 16 f9 37   Nf.:.….i….7
     0020 - 81 b6 db 13 a3 08 76 e0-59 91 38 12 15 0a 43 9e   ……v.Y.8…C.
     0030 - da df b2 8c d4 57 00 be-ef 77 30 12 77 4e 08 92   …..W…w0.wN..
     0040 - 1c d6 ee ca d2 98 41 79-47 c7 b7 69 1e 93 f4 91   ……AyG..i….
     0050 - 80 8e 9a 20 f7 88 30 4d-22 3b 96 37 22 6c 1e bd   … ..0M";.7"l..
     0060 - ca 98 87 3c 25 4c ca 33-c9 07 a3 45 a3 92 51 9c   …<%L.3…E..Q.
     0070 - a2 60 a6 fa 3f 5d 8f 6e-30 f9 75 4e 8d e1 17 ea   .`..?].n0.uN….
     0080 - f2 99 c5 74 fb d4 94 38-9d 29 39 8a 01 82 50 1a   …t…8.)9…P.
     0090 - e0 a2 af 40 44 75 a6 2d-a1 06 c5 9a 50 7a 3c 2e   …@Du.-….Pz<.
 Start Time: 1545966761 Timeout   : 300 (sec)
     Verify return code: 0 (ok)
 read:errno=0
I also tried a simple https://eknori.blogsite.org:3000. I (expected) result is the following server console output
[013816:000007-00007FBB7D375700] 12/28/2018 04:48:24.89 AM PROTON> GET request without QUERY [src/core/ext/filters/http/server/http_server_filter.c:236]
[013816:000007-00007FBB7D375700] 12/28/2018 04:48:24.89 AM PROTON> Invalid entry in accept encoding metadata: ' deflate'. Ignoring. [src/core/lib/surface/call.c:940]
[013816:000007-00007FBB7D375700] 12/28/2018 04:48:24.89 AM PROTON> Invalid entry in accept encoding metadata: ' br'. Ignoring. [src/core/lib/surface/call.c:940]
So, apparently, connection via external server IP address is possible, but there is a problem when the node app tries to communicate to the PROTON addin.
Unfortunately, there are no error messages; neither on the Domino server console nor in the node app.
I upgraded my Domino Server and Notes Client from V10 to V10.01 yesterday. V10.01 introduces some new features for developers.
Amongst others, there is a new class in LotusScript; NotesDominoQuery. The class is used to compile, tune, and run Domino Query Language queries.
The class and it’s methods and properties is not (yet) documented in the Domino Designer Help. But you can find the documentation ( and examples ) here.
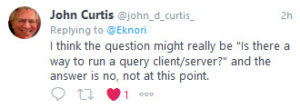
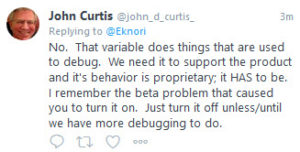
Also not documented is that you cannot run a query client/server. According to John Curtis this is not possible at this point.
I put together a small agent to execute a simple query on the server names.nsf that should return the number of douments found. When I ran the agent ( tell amgr run “db.nsf” ‘myAgent’, it found the document matching the query but also printed additional lines to the console.
I did some research and found that I have to set DEBUG_GQF_QUERY=0. John Curtis confirmed on Twitter that the variable has to be set.
NVM is known as Node Version Manager and provides an option for easy installation of Node.js.
You can install a specific Node.js version or multiple Node.js versions on the same system using nvm and use required version for application.
A bash script is available to install nvm on your system.
curl https://raw.githubusercontent.com/creationix/nvm/master/install.sh | bash
Reload system environment using this command. It will set the required environment variables to use nvm on the system.
source ~/.bashrc ## for CentOS/RHEL systems
Use
nvm ls-remote
to list available node.js versions.
Now install the node.js version you need to use for running node.js application.
nvm install v8.10.0
nvm lets you install multiple node.js versions. Simply repat the above nvm install with the needed node.js version.
As you have installed multiple node.js versions, You can select the specific version of node.js as default version used by system and load in the environment.
nvm use v8.10.0
If you have multiple node.js applications on your system and want to run each with a specific version of node.js. NVM provides you an option to use node.js version for running any application.
nvm run v8.10.0 app.js
nvm list
will provide a list of installed versions of node.js on your system. To remove any version installed on your system use
nvm remove v7.7.2
Red Hat Enterprise Linux Server (RHEL) is one of the supported platforms for Domino V10. In this post I will show how to setup a Domino V10 server on RHEL 7.4 in a just a few steps.
Did you know, by joining the free Red Hat Developers program, you can get a no-cost Red Hat Enterprise Linux subscription for developers?
This subscription includes: Red Hat Enterprise Linux Server (all currently supported releases), additional development tools, and numerous add-ons such as resilient storage, scalable file systems, and high-performance networking. The no-cost subscription also includes access to the Red Hat Customer Portal for software updates and thousands of knowledgebase articles.
After you have successfully registered as a Red Hat Enterprise Linux® Developer, you can download the iso image to setup a new RHEL 7.4 installation.
I will not go into the installation details here. I just recommend to select “minimal install”. Remember, we are installing a server. So why would we need all the overhead of a GUI.
When the installation has finished successfully you’ll have a running RHEL server 7.4. Make sure that the server is connected to the internet because we need to install a couple of packages prior to installing Domono V10.
To get updates for your RHEL 7.4 server, you must register the machine with Red Hat first using the credentials that have been used when registering for the no-cost Red Hat Enterprise Linux® Developer subscription.
subscription-manager  register --username my.mailaddress@mydomain.tld --password PaszVV0rd --auto-attach --force

Registering to: subscription.rhsm.redhat.com:443/subscription
The system has been registered with ID: 7e798124-d48a-4b55-826b-b9c77a398648

Installed Product Current Status:
Product Name: Red Hat Enterprise Linux Server
Status:       Subscribed
The Domino installer has some dependencies that are not installed during the initial setup of our RHEL 7.4 server.
yum install perl
yum install bc-1.06.95-13.el7.x86_64
To access your server via the TCP/IP, you must open some ports first. Install the firewalld package
yum install firewalld
and then open the needed ports
firewall-cmd --zone=public --add-port=22/tcp --permanent
firewall-cmd --zone=public --add-port=8585/tcp --permanent
firewall-cmd --zone=public --add-port=1352/tcp --permanent
After that reload your configuration.
firewall-cmd --reload
Next we can install Domino V10. As user root upload DOMINO_SERVER_V10.0_64_BIT_LINUX_.tar to i.e. /tmp and unpack the archive with
cd /tmp
tar xvf DOMINO_SERVER_V10.0_64_BIT_LINUX_.tar

cd linux64/domino
./install
The installation wizard will start
          Initializing Wizard........
          Launching InstallShield Wizard........


-------------------------------------------------------------------------------
Welcome to the InstallShield Wizard for IBM Domino

The InstallShield Wizard will install IBM Domino on your computer.
To continue, choose Next.


IBM Domino

IBM

https://www.ibm.com


Press 1 for Next, 3 to Cancel or 5 to Redisplay [1]
Follow the instructions on the screen. Depending on your hardware the installation process will take about 5-10 minutes.
After you install the program files for an IBM® Lotus® Domino® server on a system, you can use either a Microsoft® Windows® client system or another Domino server to run the server setup program remotely. Running the server setup program from a Windows client is easier if the client has Domino Administrator installed — to run the program from a client without Domino Administrator, you need the Java™ runtime environment plus some files from the program directory of an installed Domino server.
Follow the instructions in this technote to configure your Domino V10 server.
Finally, we want to start the Domino V10 server when the OS starts. this can easily be done using the start script by Daniel Nashed. You can get a free copy of the script here.
There will be a newer version of the script soon. Watch Daniel’s blog for updates.
Installation is straight forward; Just follow the instructions in the “Quick Configuration” section of the rc_domino_readme.txt file that comes with the start script.
[root@serv02 ~]# systemctl status domino.service
● domino.service - IBM Domino Server (notes)
   Loaded: loaded (/etc/systemd/system/domino.service; enabled; vendor preset: disabled)
   Active: active (running) since Tue 2018-11-27 15:48:55 CET; 14h ago
  Process: 1120 ExecStart=/opt/ibm/domino/rc_domino_script start (code=exited, status=0/SUCCESS)
 Main PID: 1349 (rc_domino_scrip)
    Tasks: 157 (limit: 8000)
   CGroup: /system.slice/domino.service
           ├─1349 /bin/sh /opt/ibm/domino/rc_domino_script start
           ├─1445 /opt/ibm/domino/notes/latest/linux/server
           ├─1556 /opt/ibm/domino/notes/latest/linux/logasio NOTESLOGGER reserved
           ├─1641 /opt/ibm/domino/notes/latest/linux/event
           ├─2523 /opt/ibm/domino/notes/latest/linux/update
           ├─2524 /opt/ibm/domino/notes/latest/linux/replica
           ├─2525 /opt/ibm/domino/notes/latest/linux/router
           ├─2526 /opt/ibm/domino/notes/latest/linux/amgr -s
           ├─2527 /opt/ibm/domino/notes/latest/linux/adminp
           ├─2528 /opt/ibm/domino/notes/latest/linux/smtp
           ├─2529 /opt/ibm/domino/notes/latest/linux/daosmgr
           ├─2532 /opt/ibm/domino/notes/latest/linux/dbmt -compactThreads 1 -updallThreads 1 -range 4:00AM 6:00AM -compactNdays 5 -force 1 -nounread
           ├─2598 /opt/ibm/domino/notes/latest/linux/amgr -e 1
           ├─2925 /opt/ibm/domino/notes/latest/linux/cldbdir
           ├─3072 /opt/ibm/domino/notes/latest/linux/clrepl
           ├─3265 /opt/ibm/domino/notes/latest/linux/autorepair
           └─4268 /opt/ibm/domino/notes/latest/linux/amgr -e 2

Nov 27 15:48:54 serv02.fritz.box systemd[1]: Starting IBM Domino Server (notes)...
Nov 27 15:48:55 serv02.fritz.box rc_domino_script[1120]: Archived log file to '/local/notesdata/notes_181127_154855.log'
Nov 27 15:48:55 serv02.fritz.box rc_domino_script[1120]: Starting Domino for xLinux (notes)
Nov 27 15:48:55 serv02.fritz.box rc_domino_script[1120]: Warning: Cannot write to [FTBasePath] '/local/ft' (/local/ft)
Nov 27 15:48:55 serv02.fritz.box rc_domino_script[1120]: done PID is 1349
Nov 27 15:48:55 serv02.fritz.box systemd[1]: Started IBM Domino Server (notes).
[root@serv02 ~]#
If everything is set correct, you will now have a Domino V10 server running on RHEL 7.4
Ist schon lustig, wenn man mit dem Support in einer remote session sitzt, und der Supporter ganz genau wissen will, welche Client Version man verwendet, obwohl es sich um ein Server Problem handelt.
Aber auch die Server Version ist interessant. Und selbstverständlich bekommt man nur Support, wenn man alles auf supporteten Betriebssystemen installiert hat.
Der Supporter braucht das nicht.
Er verwendet Windows 10 als Betriebssystem für den Domino 10. Und fragt per Ticketsystem zurück, warum er die übermittelten .nsf in seinem Client nicht öffnen kann. Nun ja, ODS53 geht nun mal nur mit V10 …
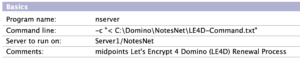
Andy Brunner informed me a couple of days ago that using the “te amgr run” in a server program document command does no longer work after upgrading the server to Domino V10.
You will get an error message on the console similar to this one
Tell AMGr Run ‘LE4D.nsf’ ‘letsencrypt’
15.10.2018 07:24:11 AMgr: Start executing agent ‘ ‘ in ‘LE4D.nsf’
15.10.2018 07:24:11 AMgr: Error attempting to load agent ‘ ‘ in ‘LE4D.nsf’: Entry not found in index
I have created a case with IBM support. The case number is TS001489373 and the issue is tracked unter SPR# GFALB5NKTV.
The case has already been escalated to development and they are investigating the issue and I’m awaiting their feedback.
In the meantime, you can use the following workaround ( Thanks to Andy Brunner )
Create a text file on the server. The file can contain one or more lines where the syntax is the same as when you start an agent from the Domino console.
Tell AMgr Run “LE4D.nsf” ‘letsencrypt’
Next change your program document to use the text file as input
NotesIdVault and NotesUserId are new classes as of IBM Notes 9.0.1 FP9. These classes provide a representation of the secure storage facility for UserIDs that may be configured for Domino by policy.
The classes are also available in Java and JavaScript.
This sound promising. As a developer you are now able to access the IDVAULT programmatically, get and put UserIds, resetPassword, mark an ID as active or inactive and force a resync if an ID becomes corrupt for some reason.
Well, this is what I thought when I first read about the new classes.
Let us take a closer look at some methods.
When you look at the list of methods in the NotesIDVault class, you can easily see that a couple of methods are not available.
I have tested other methods, and all of them do what they are supposed to do. Except GetUserId.
GetUserId returns an NotesUserID. This might not be too bad, because this is exactly what we want to get when calling this method. But, if you expect to be able to download the id file to the local file system, you’ll be disappointed.
The documentation says
This object is primarily used to obtain the names of the private encryption keys which are available for use within the UserID object.
Frankly said, completely useless.
You could get the attached user.id with traditional Lotsuscript ( locate the document, detach the embedded object ), but I would expect this as a method in either the NotesIDVault or NotesUserId class. Once again, half backed stuff. I hope that the guys and gals at HCL are more open for enhancement requests than IBM was.
UPDATE: There IS actually a method in the NotesIDVault class to detach the user.id from the vault document to the local file system!
At the bottom of this article you find an updated version of my IDVAULT class the extends the NotesIdVault class and lets you extract an id file.
A couple of years ago, I wrote my own IDVault class in Lotusscript. It uses LS2CAPI functions that let you do more than the provided LS classes.
The class provides methods to
IdFileGet() lets you download the user.id file from the vault document to the local file system. Much better than the method from the LS class, isn’t it.
IdFileExtract() lets you get the user.id from the vault document to the local file system WITHOUT knowing the password. It uses the ResetPassword method to apply a new password to the user.id and some “magic” to llet the original vault document remain unchanged.
The magic behind this is that you must make a copy of the vault document prior to resetting the password. The copy MUST be stored in another database. After you have downloaded the ID with IDFileGet(), you must replace the vault document with the copy.
Here is a sample agent ( the agent signer must be a password reset authority in the IDVault )
%REM
	Agent test
	Created Sep 18, 2015 by Ulrich Krause/singultus
%END REM

Option Declare
Use "IDVault"

Sub Initialize
	Dim idv_db As NotesIdVaultDb
	Dim bck_db As NotesIdVaultDb
	Dim vaultServer As String
	Dim vaultDb As String
	Dim vaultDb_backup As String

	vaultServer = "develop1/gotham"
	vaultDb = "IBM_ID_VAULT\batcave.nsf"
	vaultDb_backup =  "IBM_ID_VAULT\batcave_bck.nsf"

	Dim idv_doc As NotesIdVaultDocument

	Set idv_db = New NotesIdVaultDb(vaultServer, vaultDb)

	If ( idv_db.IsConnected() ) then
		Set idv_doc = New NotesIdVaultDocument(idv_db.db,nothing)
		Set bck_db = New NotesIdVaultDb(vaultServer, vaultDb_backup)

		If ( bck_db.IsConnected() ) Then
			Set idv_doc = New NotesIdVaultDocument(idv_db.db, bck_db.db)
		Else
			Set idv_doc = New NotesIdVaultDocument(idv_db.db, Nothing)
		End If

		idv_doc.ServerName = vaultServer
		idv_doc.UserName = "cn=Harvey Dent/o=gotham"
		idv_doc.Password = "hdent001"
		idv_doc.IdFilePathName = "C:\Notes\Data\ids\people\backup\hdent_with_new_pwd.id"
		'Call idv_doc.ResetPassword()
		'Call idv_doc.IdFileGet()
		'Call idv_doc.IdFilePut()
		Call idv_doc.IdFileExtract()
		'Call idv_doc.markInactive()
		'Call idv_doc.markActive()
		MsgBox idv_doc.LastErrorString

	End if

End Sub
Here is the updated version. This version is also platform independend
Here is a set of videos that demo the new features in Domino V10.
A couple of weeks ago, I noticed that hyperlinks in a Notes mail do no longer open. I did not pay much attention to it, because I am reading my mails mostly in the browser or on a smart device.
Today, I did some Google research. I came across an old technote that best describes the behaviour.
LO56433: CANNOT CLICK URLS IN NOTES 8.5.2 WITH OS BROWSER
What I found is that HKEY_CLASSES_ROOT\https\shell\open\command\ pointed to a non existing browser and HKCU\Software\Classes\http\shell\open\command\ was completely missing in the system registry.
Setting the entries to the DEFAULT iexplore.exe has fixed the issue.
electron-reload is the simplest way to load contents of all active BrowserWindows within electron when the source files are changed.
To add electron-reload to your existing project, type
npm i electron-reload --save-dev
Initialize this module with desired glob or file path to watch and let it refresh electron browser windows as targets are changed
const electron = require('electron');
const path = require('path');
const url = require('url');

const { app, BrowserWindow } = electron;

require('electron-reload')(__dirname);

let win;

app.on('ready', createWindow);
Here is a small video showing electron-reload in action.
You can download the source code for this article here.
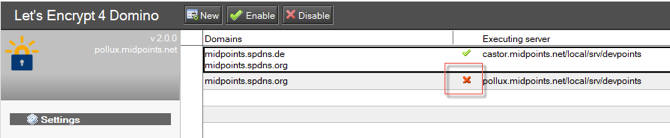
On March, 28th, we released LE4D v2.0. If you are running LE4D v1.x, you must update to v2.0. Certificate renewal will no longer work with v1.x because of some changes on the Let’s Encrypt API endpoint.
Here are some additional hints.
In v2.0, we added a new feature to toggle the status of setings documents. All new settings are disabled by default. And also, after the design replace, you have to enable them prior to run the agent.
You might see the following error message on the Domino console:
29.03.2018 08:21:39 Agent Manager: Agent error: Caused by:
29.03.2018 08:21:39 Agent Manager: Agent error: com.ibm.jsse2.util.h: No trusted certificate found
29.03.2018 08:21:39 Agent Manager: Agent error: at com.ibm.jsse2.util.g.a(g.java:21)
This happens most likely after you have applied a FP or HF. In all cases we have seen, the cacerts is replaced with the default cacerts during FP/ HF install.
To fix this problem, you have to import the needed certificates again.
The certificates can be found here https://letsencrypt.org/certificates/
An “HowTo” about importing the certs can be found here http://abdata.ch/add-a-root-certificate-to-ibm-domino-jvm-keystore/
You might see the following error message on the Domino console:
28/03/2018 22:51:58 Agent Manager: Agent error: at lotus.domino.NotesThread.run(Unknown Source)
28/03/2018 22:51:58 Agent Manager: Agent printing: [ERROR] – Order’s status (“invalid”) was not pending
28/03/2018 22:51:58 Agent Manager: Agent printing: LE4D – finished!
Due to the change in the underlying ACME protocol, Let’s Encrypt needs to re-validate the HTTP challenge on certificate renewal. Do do this, the challenge token must be accessible on the Domino server on port 80.
If you only have port 443 open, then the challenge will fail and you will see the error message.
Just for clarification. Port 80 is only needed for the first time challenge validation after the upgrade to LE4D v2.0. It is also needed, when you change the configuration and add a new host to the existing list of hostnames.
After the challenge has been validated, you can close port 80 again. It is not needed for certificate renewal.
I tried to update my ESXi 6.5 server yesterday and ran into this error “[Errno 28] No space left on device”.
Before I tell you, how I solved the issue, I would like to show, how I do my updates.
You can download update files from VMWare, but there is an easier way to keep your ESXi server up to date.
On an ESXi host, you need to activate remote command execution explicitly. This protects your server and prevents that you can log in to the host by using a remote shell. You can enable remote command execution from the direct console or from the vSphere Web Client.
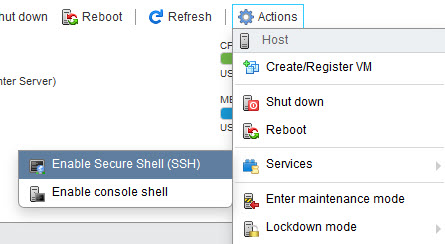
Now you can open a shell using your preferred tool.
The “VMware Front Experience ” blog has a list of recent patches and updates available .
Click on the “image profile” link for the patch, you want apply.
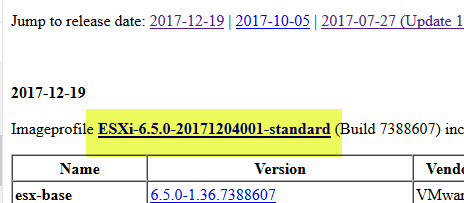
A popup will open.
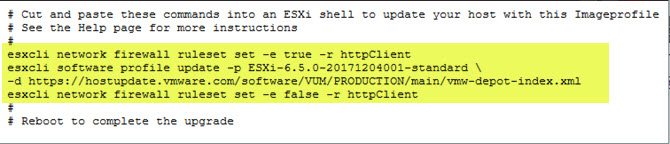
Execute the commands from the shell. In general, this is a no no-brainer. You apply the patches, and after that, you have to restart the ESXi server. Done!
But today, for some reason, I got this error message “[Errno 28] No space left on device”.
There are several “solutions” that all tell you to delete obsolete log files and the like. But none of this solutions really solve the problem. If you have not changed the log settings, then ESXi rotates logs.
Therefore, it is unlikely that you use all of the available disk space for logging.
Another solution suggested to change the file system. This can be dangerous. If something goes wrong, you will end up in a useless piece of hardware.
But I finally found the root cause. The system swap file has become very large, leaving no space to unpack the patch files.
What can you do? You can move the swap file to another datastore.

By default, the “Datastore” is set to none. This means that the system partition is being used. Change the setting and run the update command again. You can now update your server without any problems.
MyBatis is a first class persistence framework with support for custom SQL, stored procedures and advanced mappings. MyBatis eliminates almost all of the JDBC code and manual setting of parameters and retrieval of results.
MyBatis can use simple XML or Annotations for configuration and map primitives, Map interfaces and Java POJOs (Plain Old Java Objects) to database records.
MyBatis makes it easier to build better database-oriented applications more quickly and with less code.
I am using Microsoft SQL Server 2017 in my example, but you are free to use any other SQL server.
I have Microsoft SQL Server 2017 installed on RHEL 7. The installation and configuration was a matter of just a couple of minutes. Here is what I did.
Configure the repository
sudo curl -o /etc/yum.repos.d/mssql-server.repo https://packages.microsoft.com/config/rhel/7/mssql-server-2017.repo
Install the server
sudo yum install -y mssql-server
Configure the server
sudo /opt/mssql/bin/mssql-conf setup
If you want to use a different port
sudo /opt/mssql/bin/mssql-conf set network.tcpport 1433
Enable and start the service
systemctl enable mssql-server
systemctl status mssql-server
Configure your firewall and reload the settings
sudo firewall-cmd --zone=public --add-port=1433/tcp --permanent
sudo firewall-cmd --reload
To access the server, you can use Microsoft SQl Management Studio, which has about 900 MB, or a more lightweight solution like SQuirrel
For my example, I created a database eknori and a table users. The table is dead simple with only an id, firstname and lastname for a user.
CREATE TABLE [dbo].[users](
	[id] [varchar](50) NOT NULL,
	[firstname] [varchar](max) NULL,
	[lastname] [varchar](max) NOT NULL,
) ON [PRIMARY] TEXTIMAGE_ON [PRIMARY]
With SQl server running, we can now start to create our project to work with the database.

You can download the source code here.
Since we are communicating with the database, we have to configure the details of the database. config.xml is the file used for the XML-based configuration. By using this file, you can configure various elements.
<?xml version="1.0" encoding="UTF-8"?>
<!DOCTYPE configuration PUBLIC "-//mybatis.org//DTD Config 3.0//EN" "http://mybatis.org/dtd/mybatis-3-config.dtd">

<configuration>
    <typeAliases>
        <typeAlias alias="User" type="de.eknori.sql.model.User"/>
    </typeAliases>

    <environments default="development">
        <environment id="development">
          <transactionManager type="JDBC"/>
            <dataSource type="POOLED">
                <property name="driver" value="com.microsoft.sqlserver.jdbc.SQLServerDriver"/>
                <property name="url" value="jdbc:sqlserver://YourServer:1433;databaseName=eknori"/>
                <property name="username" value="sql-user"/>
                <property name="password" value="sql-pwd"/>
            </dataSource>
       </environment>
    </environments>

    <mappers>
       <mapper resource="de/eknori/sql/mybatis/mapper/User.xml"/>
    </mappers>
</configuration>
Within the environments element, we configure the environment of the database that we use in our application.
In MyBatis, you can connect to multiple databases by configuring multiple environment elements. To configure the environment, we are provided with two sub tags namely transactionManager and dataSource.
The dataSource tag is used to configure the connection properties of the database, such as driver-name, url, user-name, and password of the database that we want to connect.
Instead of specifying the absolute class name everywhere, we can use typeAliases, a shorter name for a Java type.
The mapper element is used to configure the location of mapper xml files, which contain the mapped SQL statements. Our file is User.xml.
<?xml version="1.0" encoding="UTF-8"?>
<!DOCTYPE mapper PUBLIC "-//mybatis.org//DTD Mapper 3.0//EN" "http://mybatis.org/dtd/mybatis-3-mapper.dtd">

<mapper namespace="User">

    <resultMap id="result" type="User">
        <result property="id" column="id"/>
        <result property="firstname" column="firstname"/>
        <result property="lastname" column="lastname"/>
    </resultMap>

    <select id="selectAll" resultMap="result">
        SELECT * FROM users;
    </select>

 	<select id="selectById" parameterType="int" resultMap="result">
        SELECT * FROM users WHERE id = #{id}
    </select>

 	<insert id="insert" parameterType="User">
        INSERT INTO users (id, firstname, lastname) VALUES (#{id},#{firstname}, #{lastname});
    </insert>

    <update id="update" parameterType="User">
        UPDATE users
        SET firstname = #{firstname}
        SET lastname = #{lastname}
        WHERE id = #{id}
  	</update>

	<delete id="delete" parameterType="int">
        DELETE from users WHERE id = #{id}
    </delete>
</mapper>
This configuration abstracts almost all of the JDBC code, and reduces the burden of setting of parameters manually and retrieving the results.
We only need some simple methods and POJO to send and receive data to and from the database.
Here is our User object.
package de.eknori.sql.model;

public class User {

	private int		id;
	private String	firstname;
	private String	lastname;

	public int getId() {
		return id;
	}

	public void setId(int id) {
		this.id = id;
	}

	public String getFirstName() {
		return firstname;
	}

	public void setFirstName(String name) {
		firstname = name;
	}

	public String getLastname() {
		return lastname;
	}

	public void setLastname(String lastname) {
		this.lastname = lastname;
	}

	@Override
	public String toString() {
		return "id: " + id + " FirstName: " + firstname + " LastName: " + lastname;
	}
}
userDAO contains the methods that use the mapped SQL statements from User.xml
package de.eknori.sql.dao;

import java.util.List;

import org.apache.ibatis.session.SqlSession;
import org.apache.ibatis.session.SqlSessionFactory;

import de.eknori.sql.model.User;

public class UserDAO {

	private SqlSessionFactory sqlSessionFactory = null;

	public UserDAO(SqlSessionFactory sqlSessionFactory) {
		this.sqlSessionFactory = sqlSessionFactory;
	}

	public List<User> selectAll() {
		List<User> list = null;
		SqlSession session = sqlSessionFactory.openSession();

		try {
			list = session.selectList("User.selectAll");
		} finally {
			session.close();
		}

		return list;

	}

	public User selectById(int id) {
		User user = null;
		SqlSession session = sqlSessionFactory.openSession();
		try {
			user = session.selectOne("User.selectById", id);

		} finally {
			session.close();
		}
		return user;
	}

	public int insert(User user) {
		int id = -1;
		SqlSession session = sqlSessionFactory.openSession();

		try {
			id = session.insert("User.insert", user);
		} finally {
			session.commit();
			session.close();
		}
		return id;
	}

	public void update(User user) {
		@SuppressWarnings("unused")
		int id = -1;
		SqlSession session = sqlSessionFactory.openSession();

		try {
			id = session.update("User.update", user);

		} finally {
			session.commit();
			session.close();
		}
	}

	public void delete(int id) {

		SqlSession session = sqlSessionFactory.openSession();

		try {
			session.delete("User.delete", id);
		} finally {
			session.commit();
			session.close();
		}
	}
}
Finally we have ConnectionFactory that reads config.xml and establishes a connection to the database.
package de.eknori.sql.mybatis;

import java.io.FileNotFoundException;
import java.io.IOException;
import java.io.Reader;

import org.apache.ibatis.io.Resources;
import org.apache.ibatis.session.SqlSessionFactory;
import org.apache.ibatis.session.SqlSessionFactoryBuilder;

public class ConnectionFactory {

	private static SqlSessionFactory sqlSessionFactory;

	static {
		try {

			String resource = "de/eknori/sql/mybatis/config.xml";
			Reader reader = Resources.getResourceAsReader(resource);

			if (sqlSessionFactory == null) {
				sqlSessionFactory = new SqlSessionFactoryBuilder().build(reader);
			}

		} catch (FileNotFoundException fileNotFoundException) {
			fileNotFoundException.printStackTrace();
		} catch (IOException iOException) {
			iOException.printStackTrace();
		}
	}

	public static SqlSessionFactory getSqlSessionFactory() {
		return sqlSessionFactory;
	}
}
We are now ready to read and write data from and to the database
package de.eknori.sql;

import java.util.List;

import de.eknori.sql.dao.UserDAO;
import de.eknori.sql.model.User;
import de.eknori.sql.mybatis.ConnectionFactory;

public class Main {

	private static User	user	= null;
	private static int	id		= 999;

	public static void main(String args[]) {

		UserDAO userDAO = new UserDAO(ConnectionFactory.getSqlSessionFactory());

		List<User> users = userDAO.selectAll();
		users.forEach(element -> System.out.println(element));

		userDAO.delete(id);

		user = new User();
		user.setId(id);
		user.setFirstName("Ulrich");
		user.setLastname("Krause");
		userDAO.insert(user);

		user = userDAO.selectById(id);

		System.out.println(user);

	}
}
That is easy, isn’t it?
myBatis has more options to configure your project like Annotations and Dynamic SQL, but I found the configuration via .xml mapper files the easiest one to start with.
If you want to use other SQL servers instead, you only have to configure config.xml accordingly and download and import the correct driver.
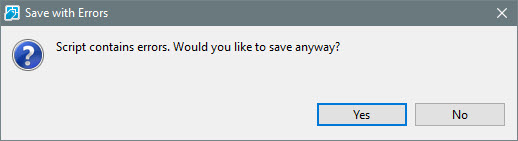
When editing code in the LS editor, code will become corrupt.
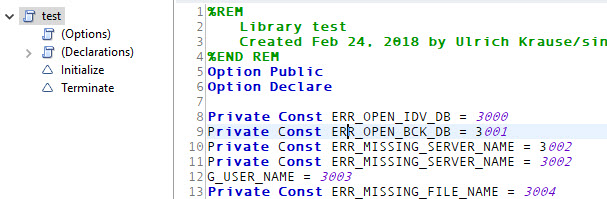
Private Const ERR_OPEN_IDV_DB = 3000
Private Const ERR_OPEN_BCK_DB = 3001
Private Const ERR_MISSING_SERVER_NAME = 3002
Private Const ERR_MISSING_USER_NAME = 3003
Private Const ERR_MISSING_FILE_NAME = 3004
Private Const ERR_MISSING_PWD = 3005
Private Const ERR_DOC_MARKED_INACTIVE = 3006
Private Const ERR_DOC_MARKED_ACTIVE = 3007

Private Const ERR_OPEN_IDV_DB_MSG = "Unable to open IDVault database "
Private Const ERR_OPEN_BCK_DB_MSG = "Unable to open backup database"
Private Const ERR_MISSING_SERVER_NAME_MSG = "ServerName must not be empty"
Private Const ERR_MISSING_USER_NAME_MSG = "UserName must not be empty"
Private Const ERR_MISSING_FILE_NAME_MSG = "IdFilePathName must not be empty"
Private Const ERR_MISSING_PWD_MSG = "Password must not be empty"
Private Const ERR_DOC_MARKED_INACTIVE_MSG = "Document is already marked inactive"
Private Const ERR_DOC_MARKED_ACTIVE_MSG = "Document is already marked active"
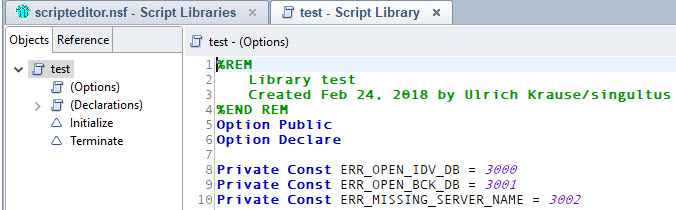
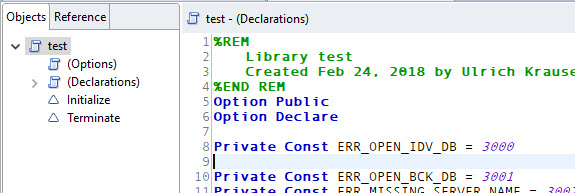
You will get an error message
Click a couple of time in the code. After a while you will see that codelines start to duplicate and also codelines are truncated.
I was able to recreate the issue with applications that have been created years ago as well as new applications that were created using 901FP10. The error is reproducible by other customers, too.
The issue is NOT reproducible with 901FP9
I have created a PMR# 92011,031,724 with IBM today.
UPDATE: IBM has confirmed the bug. Tracked under SPR# KHLEAWNPZ6 (APAR #LO93728)
After upgrading to Domino 901FP9, the latest jRebel version crashed the server. But not all server with this combination of software releases. With FP10 it got worse; now the crash was reproducible on all servers.
I created a PMR with IBM and the issue is tracked under SPR# OSAMAVRQKN
The above crash is easily recreatable locally without Domino or jRebel involved with JAVA 8 release.
On Windows:
On Linux:
I did further testing with various java releases.
The first non-working level reproducing this crash for each java release is given below:
Above test results indicate that crash doesn’t happen at JAVA 6/26 SR4 or below. Crash doesn’t occur at JAVA 7 SR3 or below. JAVA 7.1 and JAVA 8 releases reproduce this crash from General Availability onwards.
Complete JAVA 6 release doesn’t reproduce this crash and runs fine including the latest build.
Today I got a response from the J9VM support team.
In old versions of JDK, by default we are using nocompressedrefs (meaning -Xnocompressedrefs). So jre/lib/amd64/default is the one where we find all the JVM native libraries.
In newer versions of JDK, by default we are using compressedrefs (meaning -Xcompressedrefs). So jre/lib/amd64/compressedrefs is the one where we find all the JVM native libraries.
Therefore it would cause native library mis-match if you use -Dcom.ibm.oti.vm.bootstrap.library.path=jre/lib/amd64/default for -Xcompressedrefs.
The following commands will fail (becaue it would have native library mis-match):
The following commands will be OK (becaue it would not have native library mis-match):